
The Windows Snipping Tool is a built-in utility that allows you to take screenshots (or snips) of your screen. It provides multiple options to capture different areas of your screen, annotate the snips, and save or share them.
- APP : Snipping Tool
- License : Freeware
- OS : Windows
- Developer : Microsoft
Below is a tutorial on how to use the Snipping Tool effectively.
Opening the Snipping Tool
There are a couple of ways to open the Snipping Tool in Windows:
- Using the Start Menu:
- Click the Start button (or press the
Windows key). - Type Snipping Tool in the search bar.
- Click on the Snipping Tool from the search results.
- Click the Start button (or press the
- Using a Keyboard Shortcut:
- Press
Windows key + Shift + Sto directly open the snipping toolbar (this opens a newer version called Snip & Sketch on Windows 10/11, but the functionality is similar).
- Press
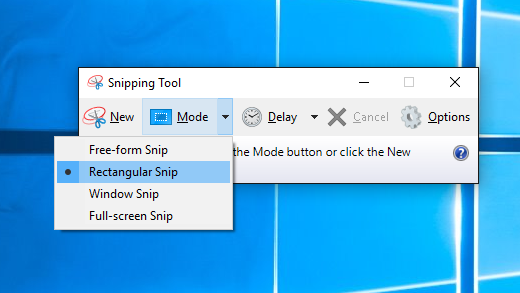
Snipping Tool Modes
The Snipping Tool offers several modes for taking screenshots:
- Free-form Snip: Allows you to draw any shape around the area you want to capture. It’s freehand, so you can be creative with what you capture.
- Rectangular Snip: Lets you capture a rectangular portion of the screen. You click and drag the cursor to outline the rectangle.
- Window Snip: Captures the active window. This is useful when you want to capture an application window without capturing the entire screen.
- Full-screen Snip: Captures the entire screen, similar to pressing the
Print Screenkey, but with the added benefit of being able to annotate and save the screenshot directly.
Taking a Screenshot
- Open the Snipping Tool.
- In the Snipping Tool window, click the Mode button (or the arrow next to New in some versions).
- Select the snip type (Free-form, Rectangular, Window, or Full-screen).
- Click New to start a new screenshot.
- For Rectangular or Free-form snips, drag the cursor to create the capture area.
- For Window Snip, select the window you want to capture.
- The snip will be taken and displayed in the Snipping Tool editor window.
Editing and Annotating the Snip
Once you capture a screenshot, the Snipping Tool provides some basic editing options:
- Pen Tool: You can draw on the screenshot using different colors.
- Highlighter Tool: Use this to highlight certain areas of the image.
- Eraser Tool: Remove your annotations if you make a mistake.
- Delay: You can set a delay before the snip is taken, which is useful if you need to capture something that requires timing (such as a dropdown menu).
Saving and Sharing Snips
- After capturing and editing your screenshot, you can save it by clicking the File menu and selecting Save As.
- Choose the format (PNG, JPEG, GIF, etc.) and the location where you want to save the screenshot.
- You can also copy the snip to the clipboard using the Copy button (or by pressing
Ctrl + C). - To share the snip, click the Share button to send it via email or other apps.
Keyboard Shortcuts for Snipping Tool
- Windows key + Shift + S: Opens the snipping toolbar for quick snips (Rectangular, Free-form, Window, or Full-screen).
- Ctrl + C: Copy the snip to the clipboard.
- Ctrl + S: Save the snip to a file.
Differences Between Snipping Tool and Snip & Sketch
- Snipping Tool: This is the older version and is still available in Windows 10/11 but may be deprecated in future updates.
- Snip & Sketch: This is the newer version with a more modern interface and additional features like sharing, annotating with touch/stylus, and using delay options.
You can still access the classic Snipping Tool, but Microsoft is encouraging users to switch to Snip & Sketch, which can also be opened using the Windows key + Shift + S shortcut.
Conclusion
The Snipping Tool (or Snip & Sketch) is a handy tool for capturing, editing, and sharing screenshots. It’s especially useful for creating tutorials, documenting bugs, or sharing information visually.